1. Introduction
Laminate Kitchen Countertops have been a great addition to kitchen designs because of their low cost, great number of designs, and durability. It is a project that keeps you busy and gives you a change in the look of your kitchen without making you spend a lot of money. Hence, in this article, we #LaminateCountertops show you how to go about it, starting from preparations to final adjustments.
Why Laminate Countertops Are Popular
Because ceramic tiles are a less expensive option than granite slabs, laminated kitchen surfaces are ideal for low—to middle-income families. They include natural stone or wooden patterns, strengthen surfaces, and improve cabinet appearance. Laminate can last for years with the right care, so while maintaining the aesthetics of your kitchen, it is a rustic, easy-care option to consider.
2. Tools and Materials You’ll Need
The kind of surface you get depends greatly on the laminate you buy and the tools you use to shape it. This section outlines some pointers before trying this project and tells you what tools you can use so you get the best surface finish.
Essential Tools
- Tape Measure: For precise measurements of your countertop area.
- Jigsaw: This is used to cut the laminate and any necessary sink or stove holes.
- Circular Saw: To cut the laminate sheet cleanly.
- Clamps: To hold the laminate in place while it adheres.
- Router: This is used to smooth the edges after cutting.
- Brush or Roller: For applying adhesive.
- Utility Knife: To trim excess laminate.
- Screwdriver: This is used to attach the countertop to the cabinets.
Materials for Laminate Countertop Installation
- Laminate sheets or pre-cut countertop panels.
- Contact cement or laminate adhesive.
- Edge trim or strips.
- Wood or MDF board for the substrate (if necessary).
3. Preparing Your Kitchen for Installation
Preparing the workspace is essential for completing the work successfully with the fewest modifications. One sees these steps in their stands’ preparation for the coming new laminate.
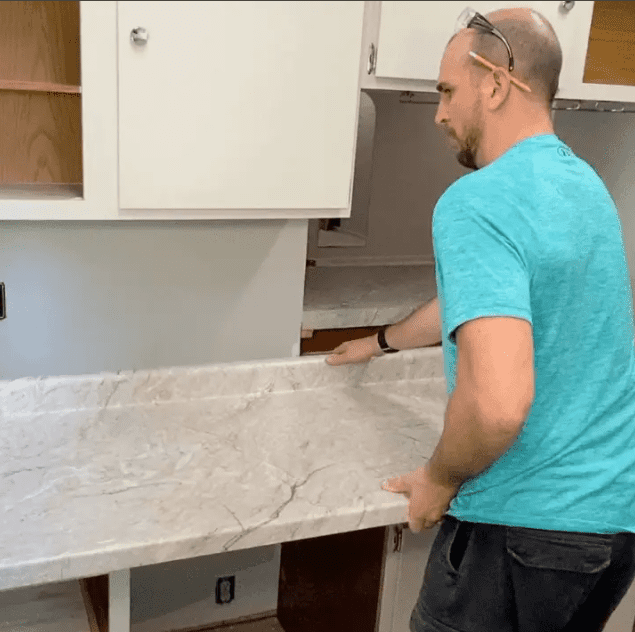
Remove Existing Countertop
If you are replacing old countertops, the first step is to remove the old boards. Detach the countertop from the cabinets using a screwdriver or a pry bar. Furthermore, remove the sink and faucet by detaching them from the plumbing stamping.
Measure the Space for the New Countertop
One should take the size of the area once the old cupboard, if there is any, is removed. It is very important to consider all available lengths, widths, and angles that corners cover even the right triangles. Always check your measurements for any mistakes before cutting them.
4. Choosing the Right Laminate Countertop
Choosing the right laminate improves the texture and design of countertops. Some crucial elements must be considered.
Types of Laminate Countertops
There are two key types of laminate countertops: HPL and TFL. HPL is somewhat superior in that it is heat and moisture-resistant and suitable for use in extremely extensive kitchens.
Laminate Styles and Colors
Laminates are highly versatile and can be coloured and patterned to resemble wood, granite, marble, and even concrete. It’s a good idea to choose a laminate that blends in with your kitchen’s design.
5. Cutting the Laminate Countertop to Size
The cut surface will give the whole thing a professional feel, so it’s important to cut it accurately. Follow the instructions mentioned below to achieve this.
Accurate Measurements
The initial work is marking the back of the laminate sheet with the counter space measurements that were taken before. Proceed to clearly mark the cutting lines with a pencil.
Using a Jigsaw for Precision Cuts
With the help of jigsaws, straight and curved cuts can be easily made. A slow, steady cut and a fine tooth blade will ensure cutting results in clean edges.
6. Installing the Laminate Countertop
Now that your countertop is cut to size, it’s time to install it. There is a required method for a perfect fit and mounting of the counter.
Applying Contact Cement
Spread a layer of contact cement along the underside of the laminate and the countertop substrate’s top side. Let the contact cement dry for twenty minutes or according to the manufacturer’s directions.
Laying the Laminate Slab
The laminate covering is then carefully laid up against the substrate, but it’s important not to adhere in this step, as it’s pivotal to fix the laminate on the countertop. If the adhesive side comes in contact with the laminate, it will bond together forever; thus, you should first inspect if it is properly aligned.
Pressing the Laminate into Place
Apply pressure to the laminate surface to tie both surfaces together using either a laminate roller or a hand. When pressing it down, start from the centre of the piece of furniture to push any air bubbles trapped in it.
7. Attaching the Countertop to the Cabinets
Now, with the use of structural silicone adhesive, the countertop is bonded to your cabinets under the force displacement.
Using Screws or Brackets
Properly screw either brackets or regular screws to attach the laminate to the top of the cabinet base frame up to the top face of the cabinet base. Important to note to attach the screws making sure that they are drilled through the cabinet frame and not solely pierce the laminate.
Ensuring Stability
While fastening the countertop, it is recommended to put wooden brackets underneath for additional support. Thus, the laminate would be very well secured.
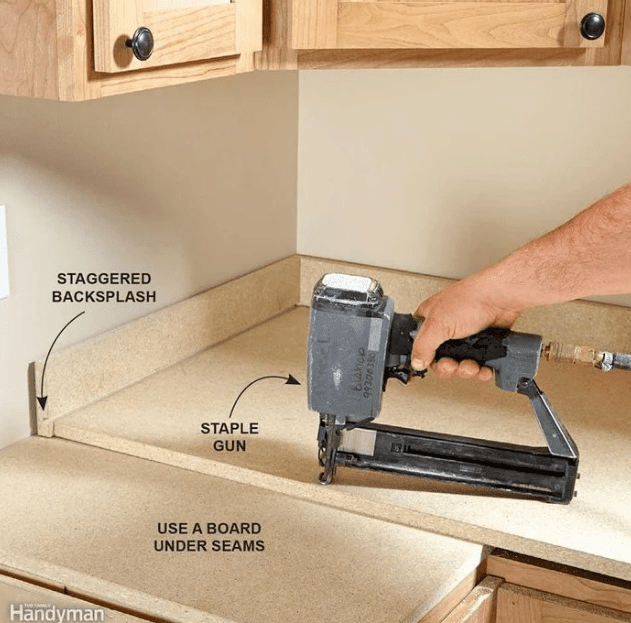
8. Finishing the Edges
Finishing the corners is definitely this countertop’s strong suit, as the quality speaks for itself. In this step, you can help yourself achieve a refined finish through small details.
Edge Strips and Trimming
Start with the edging solution by applying laminate edge strips on the edges of the countertop. Attach them with adhesive and cut the ends using utility knives.
Using a Router for a Smooth Finish
A router is highly beneficial when adding bevels or rounding edges to give the countertop a professional feel. Rather than this, polishing should be adequate in the end.
9. Sealing the Countertop
Sealants can prevent water and other stains from reaching the laminated wooden counter.
Why Sealing is Important
Laminate counters are unwelcomed by moisture, but using sealant can help strengthen them. It also assists in getting the counter `catching’ shine it should have.
Types of Sealants for Laminate Countertops
Fighting Damaging water effects can be avoided by applying a waterproof sealant that is safe for laminates and is easy to use. Apply it evenly on all the surfaces with a soft cloth.
10. Cleaning and Maintenance Tips
Countertops made of laminate look great only when well taken care of and maintained. Here are some laminate countertop maintenance tips to work with.
Routine Care for Laminate Countertops
A laminate countertop should be washed often with light soap and water. Never use strong chemicals or rough/ abrasive cleaners, as they will do more harm than good and ruin or damage the surface.
Avoiding Common Damages
Cutting boards, coasters, and trivets should be used to prevent burns, stains, and scratches. Though laminate is tough, it is not indestructible.
11. Expert Tips for a Professional Finish
How to Get a Smooth, Seamless Look
For a flawless installation, take your time with each step. Ensure your cuts are precise and use a roller to press down the laminate firmly.
Expert Advice on Best Practices
Experts suggest that while using tools and laminate, always wear goggles and gloves for safety measures and allow enough time for the adhesive and cement to dry.
12. Conclusion
Finally, laminate countertops are quite easy to install, and they are a good DIY project that can make your kitchen completely new. If you are careful while following the process, you will have a surface that is not only good to look at but functional for a long time. Remember to clean and take care of the countertops after the installation as well because that way, they will remain as good as new.