

1. Introduction
It is the hearth—the kitchen table where people make memories. Whether it is the kitchen table that hosts major dinners, homework time, holiday meals, or just daily breakfast and supper, it must be protected well and kept attractive for future generations. That is where kitchen table poly—short for polyurethane—enters the picture. While we may not offer a bundled assembly of instructions for practically selecting the right polyurethane, applying it, and subsequently maintaining the finish, the flow of this article will guide you on how to get the best finish on your kitchen table and other wooden furniture.
2. Understanding Polyurethane Finishes
What is Polyurethane?
Polyurethane is a synthetic resin widely used to protect surfaces against wear, tear, and moisture. It creates a tough and rigid surface that can withstand the various day-to-day challenges of a kitchen environment, such as spilling drinks, hot sauces, and pots.
In addition to protecting the surface of the wood, this clear coat also tends to make the grain and colour of your kitchen table stand out.
Types of Polyurethane Finishes
Polyurethane finishes come in two main types, two broad categories of paints: water-based and oil-based. Both varieties have their benefits, and one should be employed depending on the appearance being sought and the amount of protection required.
Benefits of Using Polyurethane on Kitchen Tables
Of course, polyurethane has many advantages over wood for kitchen tables. It dramatically boosts its defence against scratches, stains, and moisture, bringing out the grained wood’s glowing look.
Also, its output strength is fairly manageable, meaning polyurethane is a substance that anyone can easily apply, whether doing a do-it-yourself project or a professional carpenter.
3. Types of Polyurethane Finishes
Water-Based Polyurethane
Water-borne polyurethane has low VOC content and low odour, which makes it suitable for use where fast drying is required and where it is to be used indoors. It has a non-yellowing sheen, simply revealing the real hue of the timber grain. This type of finish is especially used for lighter woods such as maple or oak, in which case the natural colour is to be retained.
Oil-Based Polyurethane
Oil-based polyurethane is amber and offers a richer, warmer appearance. While drying takes more time and produces a more pungent smell, it is radically harder than the first type and better withstands heat and chemicals.
This finish is good for dark woods such as walnut and mahogany, and some other woods that look slightly amber will look good.
Differences Between Water-Based and Oil-Based
Selecting water-based polyurethane and oil-based polyurethane is up to the individual and the requirements of the kitchen table.
Waterborne is just the best for those who have no time. They like their finish to be crystal clear and not yellow within a short time of application, while the oils are good for a longer, longer-lasting, warm amber finish.
Which Finish is Best for Your Kitchen Table?
The choice of finish depends on various factors, including the type of wood used, the desired finish, and the expected traffic the kitchen table will receive.
An oil-based polyurethane can be more suitable for parents with active children and pet owners since it is more wear-resistant.
Nevertheless, if you want to ensure that your coat of polyurethane does not emit a strong smell and dries fast, water-based polyurethane is just the thing.
4. Application Techniques
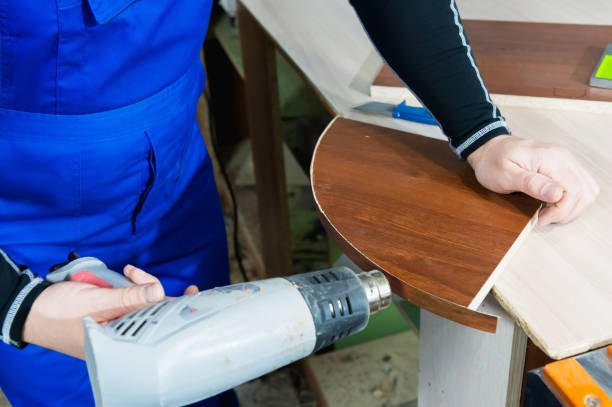
Preparing Your Table for Polyurethane
However, it is always necessary to prepare the surface of the kitchen table appropriately before applying polyurethane. The first step is to sand the table to remove all the surface defects.
It is recommended that fine-grain sandpaper be employed, and movements should be in the direction of grain flow when sanding.
Then, the table surface can be wiped with a damp cloth to ensure that I remove all the dust that could be on it after sanding, leaving a clean surface for the polyurethane.
Step-by-Step Application Guide
- Stir the Polyurethane: Gently stir the polyurethane to mix the components, avoiding bubbles.
- Apply the First Coat: Using a high-quality brush or foam applicator, apply the first coat in long, even strokes, following the direction of the wood grain.
- Let it Dry: Allow the first coat to dry completely, which can take 2 to 24 hours, depending on the type of polyurethane.
- Sand Between Coats: Lightly sand the surface with fine-grit sandpaper to remove imperfections and ensure a smooth finish.
- Apply Additional Coats: Repeat the process for 2-3 coats, depending on the level of protection you desire.
Tools You Will Need
To achieve a professional finish, you’ll need a few essential tools:
- High-quality brush or foam application
- Fine-grit sandpaper (220 grit or higher)
- Clean, lint-free cloths
- Stirring stick for the polyurethane
- Protective gloves and mask for safety
How to Avoid Common Mistakes
Among all the pitfalls of polyurethane application, one might name the application of too thick a coat, which may cause bubbles and an uneven surface. One has to ensure that he puts a very thin layer of this varnish, and it is also very easy to sand between each coat.
Furthermore, it is important to always let polyurethane dry before applying the next layer to prevent the formation of a sticky surface.
5. Maintenance Tips
Daily Care for Polyurethane Finishes
After coating the kitchen table with polyurethane, maintaining its beauty is rather easy. Clean the table often with a soft mildew and a damp cloth to remove stains. Do not apply strong solvents or abrasives since they can scratch and deteriorate the surface.
How to Handle Scratches and Dings
However, even polyurethane finishes are not immune to scratches and dings, and when used frequently in a kitchen, they will show after some time.
Even quite shallow chips can almost always be removed using a piece of fabric and some automotive polishing agents. For the deeper scratch marks that can barely be seen, slight sanding may be done, and a new clear coat of polyurethane may be applied.
Long-Term Maintenance Strategies
Note that the polyurethane finish may start to wear out gradually with time. For some kitchen table owners, it is advisable to reapply polyurethane on the table every three to four years to restore its ‘as new’ look. This way, you can sustain the outer coat and have your table look as good as when it was newly purchased.
6. Common Mistakes to Avoid
Applying Too Many Coats
It may be natural to think that the more layers there are, the better, but too many layers tend to make the polyurethane build up to a thick layer that resembles plastic more than the natural grain of the wood. Limit the radio to 2-3 layers since applying more layers will compromise appearance while enhancing its protection.
Not allowing Proper Drying Time.
Polyurethane is best applied with patience. If one does not wait until each coat dries well, the surface can become sticky and untidy. It is desirable to adhere strictly to the drying times recommended by the manufacturers.
Using the Wrong Tools
The right tools are essential in achieving a good and professional job. A better-quality brush or foam applicator will help you achieve a good finish. When applying the polyurethane, it is recommended to use fine-grit sandpaper to give it a proper surface to work with.
Ignoring Safety Precautions
Polyurethane contains toxic substances if inhaled or if it comes in contact with the interior of the body. It is important to work in a well-ventilated area and wear gloves and a mask, as it may cause skin irritations or be inhaled.
7. Case Study: A Family’s Journey with Kitchen Table Poly
The Transformation of a Family Heirloom
The Smiths received a rich oak kitchen table from their ancestors, which they used in their family for years. However, the somewhat glossy surface of the table had traces of wear over the years, including scratches. They pointed to using oil-based polyurethane to re-varnish the table to bring back its past glory while retaining its history.
Challenges and Lessons Learned
Final Outcome and Reflections
The Smith family is pleased with the final result. It now stays in the middle of their house as the focal point of family history and a sturdy piece of furniture for the new generations.
It taught them to aspire to proper preparation, patience, and attention to detail in other aspects and details of the project or any do-it-yourself project.
8. Future Outlook and Trends in Kitchen Table Poly
Emerging Trends in Polyurethane Finishes
As more individuals try to create interiors, the focus shifts to custom finishes and special uses of polyurethane. The technique includes matte finishes, which offer a sleek and minimalistic look to the house, and highly glossy finishes, which offer a loud and dominant look.
Eco-Friendly Alternatives
More and more people are becoming conscious of the environment, making many homeowners seek alternatives to polyurethane. Examples of soluble polyurethanes include those based on water, which are gaining market acceptance as they are much better in terms of VOCs but as firm as their solvent-based relatives.
The Future of Kitchen Table Poly in Home Design
As trends in home design change, it is safe to say that polyurethane finishes will continue to be used in the construction of kitchen tables.
Polyurethane is hard to beat for safeguarding your furniture’s future appearance and quality, whether you decide to preserve a piece inherited from generations or design a new table for your kitchen.
9. Conclusion
These polyurethane finishes provide an ideal, lasting, and attractive shield for kitchen tables against all usage. As for water-based and oil-based finishes, it’s important to remember that preparation is everything, and so is aspect and maintenance. By adhering to the procedures highlighted in this article, you can maintain the perfect appearance of the kitchen table.
In the end, your kitchen table is more than just a piece of furniture—it’s a gathering place for family and friends, where memories are made. By investing in a high-quality polyurethane finish, you’re not just protecting your table; you’re preserving a piece of your home’s heart.


2 Comments on “Kitchen Table Poly: The Ultimate Guide to Polyurethane Finishes”